This is my first attempt at creating a writeup for the annual SANS Holiday Hack Challenge, and my first time publishing something here on Medium. I had not participated in this challenge prior to this year, so I wanted to see if I could not only finish every challenge, but also keep good notes and create a writeup once I was done. I was pretty proud of myself to finish all of the challenges, and I was extremely appreciative of everyone participating who was willing to help provide nudges when I got stuck on a few. It was also nice to be able to give out a few nudges to others!
I hope this walkthrough helps you solve some of the challenges! I haven’t done any of the Elf/Troll terminals in this, but they are pretty straightforward and will help provide some hints for the various challenges but aren’t necessary depending on your skill and knowledge level. (I completed them all and they definitely helped me during some of the challenges!)

KringleCon Orientation
Objective 1 — KringleCon Orientation
Upon walking to the gate to the North Pole, you encounter Jingle Ringford. Jingle greets you and give you an introduction in how to navigate the environment and provides you with your first item, a wi-fi adapter.Click on the wi-fi adapter to add it to your inventory.

Random wifi adapters are completely legit, right??
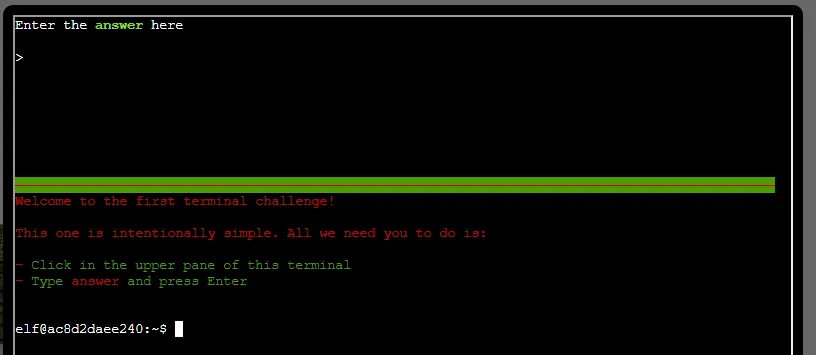
Hmm…. I wonder what the ANSWER could be??? I almost didn’t even make it into KringleCon.
Objective 2 — Where in the World is Caramel Santaigo??
Oh. My. Goodness. This brought back ALL of the feels! The best day of the week growing up as a kid in the late 80s and early 90s was getting to go to the school computer lab for an hour and work with an Apple IIe! Some days it was mundane things like working on typing, however it was always a special treat getting to play Where in the World/USA is Carmen Sandiego!! Opening up the “World Almanac” and searching for answers, arguing with the partner you were forced to be with because there weren’t enough computers, saying “I told you!!!” whenever your partner chose the wrong location… Anyway, I probably played this challenge more times than necessary because it brought back those old memories and was quick and fun. There IS a way to hack this challenge, however I couldn’t bring myself to do it and instead chose to focus on doing it the right way.

All Tangled
Entering the Courtyard in Santa’s Castle will bring you to Tangle Coalbox and the terminal for Objective 2. Clicking on Tangle will bring up a dialog telling you to click on the terminal next to him to begin the challenge, or to talk with Piney Sappington for hints. Tangle tells you that this challenge involves finding some wayward elves and will involve some OSINT (Open Source Intelligence). Clicking the terminal opens up the game screen and explains the basic instructions for the game.
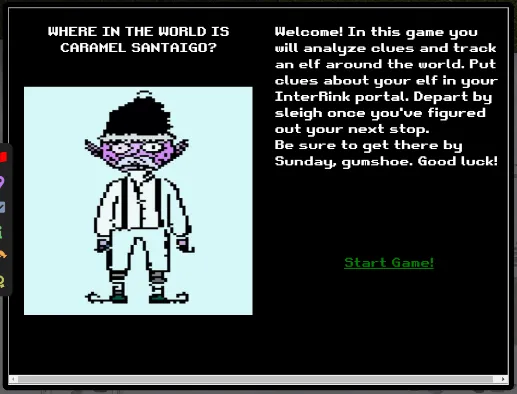
I feel like I'm 10 years old!!
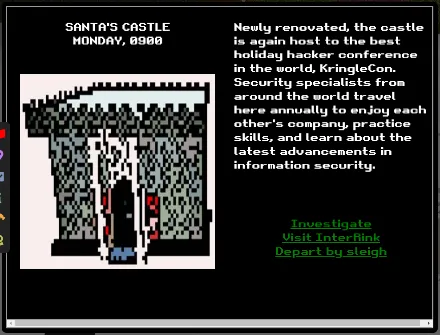
Clicking on “Start Game!” will start you off on your quest. The playthrough for this game changes, so there are multiple outcomes and knowledge necessary to complete the challenge. Using your search engine skills will be of upmost importance for this challenge. Each destination screen shows your location, date and time, and information related to where you are. You are presented with three options: Investigate, Visit InterRink, and Depart by Sleigh.
The first step in solving this challenge is to investigate your location. Each location will have three options to investigate, and it is wise to use each one to gather as much OSINT as possible about the elf in question, as well as their final destination.

Clicking on Investigate 1 provides us with our first clue:

Clicking on Investigate 2 provides us with our second clue:

Clicking on Investigate 3 provides us with our third, and final, clue:

We can first open up our favorite search engine and search for terms from our clues. Searching for “where do british children’s letters to santa go” brings us to the following description:

We can then use a site, such as ipinfo.io, to search for our next clue involving the IP range 80.95.128.0/20 and we receive the following info:
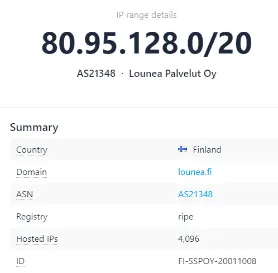
By this point, we should have a pretty good idea of where our elf is headed. We know they are headed to Finland, and can focus our efforts there whenever we travel.
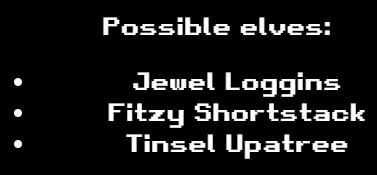
Looking at our third clue gives us some details about our elf to help narrow down who we’re looking for. We need to now click on “Visit InterRink” to input the data about our elf. We know that our elf prefers Python, so we need to click on the “Language spoken” drop down and select “Python”. It’s a good idea to look through the other drop downs at this time to give us an idea what other attributes to be on the lookout for. Once we’re done, we can then click on “Filter Elves” to narrow down our choices.

With no further clues to investigate at our current location, it is time to move on to our next. We need to click on “Depart by sleigh” where we are presented with three possible destinations to pursue. We know that the IP address range comes back to Finland, so Rovaniemi looks like a prime candidate. We can do further OSINT back in our search engine and find out that Rovaniemi, Finland is where “More than 30,000 letters, cards, and parcels arrive at Santa’s Main Post Office each day during the Christmas season.” It looks like we’ve found our target location! Clicking on Rovaniemi, Finland travels us there.

Once we arrive in Rovaniemi, Finland, we are presented with more information about the city, as well as our options to Investigate, Visit InterRink, and Depart by sleigh. We will also notice that our date and time has changed; we started our investigation on Monday at 0900 hours, and we are now currently at Monday at 2100 hours. Each bit of investigation and travel takes time, so we need to make sure we don’t have to backtrack to locations or review clues.

Our first clue tells us:
Their next waypoint was something like 51.219, 4.402
Our second clue tells us:
They just contacted us from an address in the 81.244.0.0/14 range.
Our third clue tells us:
They were dressed for 8.0°C and light rain conditions. The elf got really heated about using spaces for indents.
We can use Google Maps to find our first clue takes us to Antwerp, Belgium. Going back to ipinfo.io and searching for our IP range indicates Belgium as well. It looks like we can feel pretty confident about looking at Belgium as our next target location. Our third clue reveals more info about our elf. Before we travel, we need to go into InterRink and put our elf information. Using the dropdown for “Preferred indents” and inputting “Spaces” and then filtering the elves provides us with Jewel Loggins as our lone suspect. We’re getting close!! Now we can depart and are presented with Reykjavík, Iceland, Copenhagen, Denmark, and Antwerp, Belgium. We’ve got two clues telling us to go to Belgium, so it looks like Antwerp is the place to head!
Our first clue tells us:
I’m not sure what a hogmanay is, but that elf wants to experience one just after Christmas.
Our second clue tells us:
They sent me this blurry selfie of themself or someone they met:

They must have used the same cameras as convenience store security cameras!
Our third clue tells us:
They were dressed for 7.0°C and partly cloudy conditions. Oh, I noticed they had a Star Wars themed phone case.
So, our clues are a little bit more vague this time. We can go ahead and put “Star Wars” into the “Fandom” section and filter the elves and we are still shown Jewel Loggins, so we know we haven’t put in any wrong data! We can then go to our favorite search engine and search for “what is a Hogmanay” and we are told that “Hogmanay is the Scots word for the last day of the old year and is synonymous with the celebration of the New Year in the Scottish manner.” It looks like we’re going to Scotland, but we can do one more search for “Weather in Scotland” and are shown:

This matches up with the third clue, so we can safely say we are headed somewhere in Scotland. Clicking on “Depart by sleigh” shows us Vienna, Austria, London, England, and Edinburgh, Scotland. I feel like we’re getting close at this point, watch out Jewel, we’re on your tail and headed to Edinburgh!!
Upon arriving in Edinburgh, we are presented with the following information:

It definitely looks like we picked the right location (and this sounds like a festival I can really get into!!). Clicking on our first Investigate clue tells us that we just missed the elf!!! Clicking on Investigate 2 shows us we’ve caught up to our suspect elf, now we just need to provide the correct name!! Clicking on the drop down and selecting “Jewel Loggins” and clicking “Guess elf” brings up the next screen telling us that we’ve won!! Great job, we’ve correctly found our target!

Objective 3 — Thaw Frost Tower’s Entrance
For this objective, we need to head over to that other fest going on and check out the front of Jack Frost’s tower. We get to use the wi-fi dongle we picked up in our orientation to complete this challenge, and we can talk to Greasy Gopherguts for some tips. Greasy doesn’t want to give up any info without a little quid-pro-quo first! He asks you to complete the terminal next to him “Grepping for Gold” if you want to receive his hints on using wi-fi.
We need to find the area for the wi-fi connection and, as we approach the entrance, we can see a thermostat attached to a wall just inside the tower’s entrance to the left.

From here, we need to click on our badge and select our items and then click on “Open WiFi CLI”. If you’re familiar with using “iwlist” and “iwconfig”, then this shouldn’t be too difficult. Complete Greasy’s challenge for some tips, and check out “man iwlist” and “man iwconfig” for more details about each command.
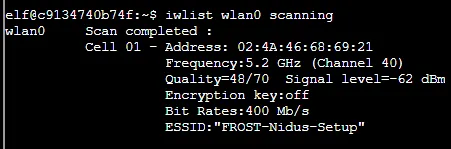
We know that we need to somehow thaw the entrance, and using the thermostat should be a good way to do it. Using the command “iwlist wlan0 scanning” we can see the following network within range:
From here, using the command iwconfig wlan0 essid FROST-Nidus-Setup will attempt to connect us to the Nidus Thermostat, however we need to visit the setup website to perform any actions. We are presented with the address to go to and are told it’s compatible with “curl”, so that should give us a good starting point. Using curl http://nidus-setup:8080 presents us with the following screen:
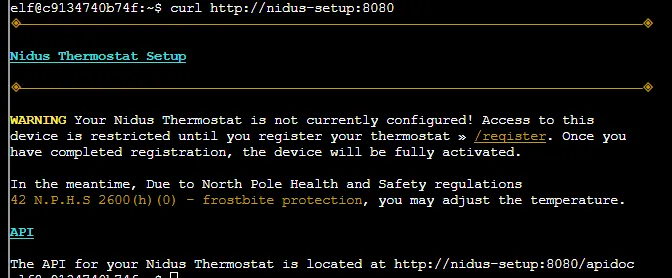
This tells us some pretty juicy information! Doing curl http://nidus-setup:8080/apidoc presents us with several commands available, however only one is available without registering.

We can utilize curl -XGET http://nidus-setup:8080/api/cooler to check the temperature of the cooler, and we’re also able to utilize a POST request with JSON payload to set the temperature. We’re also told not to set the temperature above 0 or else things might melt. Sounds like we can use a POST request to set the temperature above 0 and make some fun stuff happen! Using the GET request, we can find out the current temperature and are shown it’s a balmy -40.67 degrees!!!! We need to warm it up quite a bit to get any action to happen, and we know we need to put it above 0, so let’s try setting it at 1 degree.
Let’s use the following command from the API documentation to increase our temperature up to 1 degree:
curl -XPOST -H ‘Content-Type: application/json’ \
— data-binary ‘{“temperature”: 1}’ \
http://nidus-setup:8080/api/cooler
It looks like that works and we’re presented with the following information:
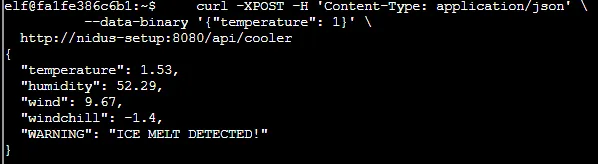
Great job, we’ve successfully melted the entrance to Frost Tower and can now proceed into FrostFest!! We can see that the doors are open, and we can also see that the thermostat on the wall has changed from blue to red!
Objective 4 — Slot Machine Investigation

We can enter this challenge by using the link provided in the objective description from our badge, or we can go into the casino floor and talk to Hubris Selfington. Hubris is worried about the security of the slot machines and tells us that the slot machine next to him is paying out too much. We can click on the slot machine behind him to begin this challenge.

Clicking the “Play Game” button on the first screen will then take us into the “Frosty Slots” screen where we can click “Play” and enter into the slot machine itself. There are two options we can change: “Bet Size” and “Bet Level” Clicking the “-”or “+” buttons will allow us to increase the bet size and level, which is shown just above in the “Total Bet” window. Clicking “Spin” will then spin the slots and play like any regular slot machine, either increasing or decreasing our credits depending on what matches we get.
This can be looked at in different ways, including using Burpsuite or just in Developer Tools from our browser (in this case, Chrome). Let’s try using our browser first, so opening Developer Tools and going to the Network tab will get us some good information.
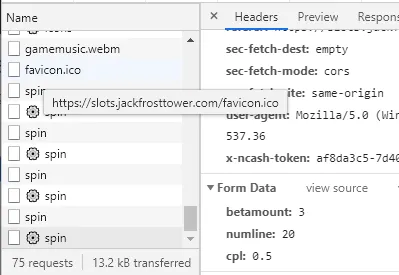
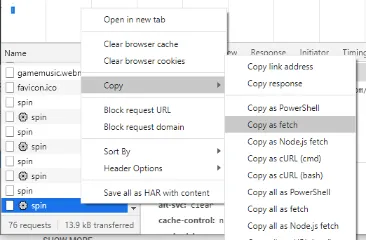
We’ll set our “Bet Size” at .5 and our “Bet Level” at 3 and then click “Spin”. Looking in our Developer Tools, we can see that each spin produces a POST request that includes our values that we set before the spin. This is viewable by clicking on the bottom “spin” item in the “Name” pane and then clicking on the “Headers” tab and scrolling to the bottom. Right-click on the bottom “spin” and then select “Copy as fetch”. We can then click on the “Console” tab and paste our copied header into the command line. From here, we can play around with the bet information. Let’s try changing the “betamount=” value and sending it.

We can then go back to the network tab and scroll down to see that our betamount changed accordingly under the header tab, and then click on the Preview tab to see that our Credit amount decreased (in this case) and we received the “Spin success” message.
Let’s see what else we can change!! Let’s go ahead and change the bet level amount, since that’s our other variable open to change in the game itself. Following the same process to copy that POST request as fetch, we will then paste it into our console and change the “cpl=” amount to “1” and hit enter. We can then go back to our Network tab and click on the Preview tab for this request and we now see thatnour credit amount increased to 1345!!! Expanding the data line will show the response:

If we take this response text and paste it into the input box in the objective screen and hit submit, we will complete this challenge!!
Obviously, this can be done using different methods depending on which browser is being used. Editing and sending headers is slightly easier and quicker in Firefox. This can also be done using the Burp Repeater functionality. This playthrough just happened to produce a winning amount by changing the amounts we could have changed normally just by playing the game correctly.
Let’s try playing again from scratch and changing the “numline=” amount. Let’s start off by maxing our “bet size” and “bet level” amounts in the game itself and pressing “spin”. In this instance, we lost big and our credits are at 0!! Let’s copy that request as fetch and go to our console and change the “numline=20” and let’s try something wild and make it “-20”.
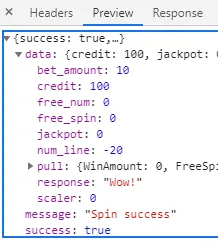
Going back to our network tab and clicking “Preview” we see that our credits are now at 100! Let’s try sending that exact same request again and seeing what our results are. We see that our credits have now gone up to 200!!! This might just be the magic number to change. Okay, enough chump change, let’s go big or go home!! Let’s resend that request again, but this time, change the “numline=” value to something wild like -2,000,000!!! Hmm… that doesn’t work and we get a server error… bummer… Let’s try to not be so greedy and just do -200. Checking our Network tab again shows us that our credits are at 1200!! So, for a sure way to beat this challenge quickly, using the “numline=” value set to “-200” will work!
Objective 5 — Strange USB Device
Heading over to the Speaker UNPreparation Room to the left of the Talks Lobby in Santa’s Castle will lead us to Objective 5. Talking to Elf Morcel Nougat gets us a little preparation for this challenge, in which we find it will involve using a Rubber Ducky, and that we can talk to Jewel Loggins for some tips. Clicking on the terminal next to Morcel, we are met with a terminal which tells us to evaluate the USB data in /mnt/USBDEVICE. If we first issue the ls -la command to show us the directory listing with all permissions and any hidden files, we see that this contains the “mallard.py” script. If we use the ls-la /mnt/USBDEVICE command we see that this only contains the “inject.bin” file. We can use the mallard.py script to reverse inject.bin by using python mallard.py — file /mnt/USBDEVICE/inject.bin. If we read through the file, we come across a line with a reverse base64 encoded string. If we copy that string, “echo ==gCz………base64 -d” and paste it into the command line and run it, we get our decoded string containing a ssh-rsa key!! If we take the username provided in this key and enter it into the top of the terminal, we find that we have solved this challenge!Objective 6 — Shellcode Primer
We are told to talk to Chimney Scissorsticks for clues about this challenge, and he can be found at the top of Santa’s Castle in the Netwars area. Chimney will ask us to play the hero game to help fuel Santa’s sleigh before he can think about shellcode and be able to give us hints. We can then move into the challenge by clicking the link within the objective from our badge, or we can go to Jack’s office and click on the terminal. Reading through the home page explains what Shellcode is and how to maneuver within this challenge. Moving into Introduction we are given an explanation of the Shellcode Primer and how to use the code to execute window and the debug window. Once done with this, we simply press “Execute” at the bottom and move on to #2. #2 talks about Loops and explains how loops work. Again, if we press “Execute” at the bottom, we will move on the #3. #3 is a simple challenge asking us to put a RETurn into the provided script. All we need to do is type “ret” at the very bottom and click “Execute” and we move on to #4. #4 is an explanation of how to place a value into a register. We are asked to set the rax register to 1337 to proceed. Below the “TODO:” line, we need to type “mov rax, 1337” and then click “Execute” to move on to #5. #5 teaches how to use system calls. We are asked to put the syscall number for “sys_exit” into rax. Using the link provided to view all of the available syscalls, we see that “sys_exit” is equal to “60”. (Use ctrl+f to easily search for “sys_exit” but make sure to choose the correct one and not “sys_exit_group”) We will need to type “mov rax, 60” below the comment line. We are then asked to put code “99” into rdi, which is done by typing “mov rdi, 99” below the comment line. We then click “Execute” to move on to #6. #6 is another simple one that explains pushing a value to the stack. We simply need to read and understand what is going on and then click “Execute” at the bottom to move on to #7. #7 explains how to access the instruction pointer (rip) since we can’t directly access rip. The code is already laid out, however we are asked to put the portion in place to “pop the top of the stack into rax”. This is a simple command of “pop rax” placed below the “TODO:” comment. Clicking “Execute” will then move us on to #8. #8 is asking us to start putting together what we’ve learned from the previous lessons to call past a plaintext string “Hello World” and then pop its address into rax. We can create a call function after the first comment line by using “call hello_world’. We can then use “hello_world:” to start our function, and then use “pop rax” on the next line. Then, we can click “Execute” to move on to #9. #9 builds off of #8, however we are now asked to print the string “Hello World!” into the standard output (stdout). We need to first create our call “hello_world”. Then, to setup our call to sys_write, we need to reference the syscall table to find sys_write, and we will then type “hello_world:” followed by “mov rax, 1” on the next line. Our next TODO item is to set rdi to the first argument, so we will type “mov rdi, 1”. Our next TODO item is to set rsi to the second argument, which is done by using “pop rsi”. Our next TODO item is to set rdx to the third argument, which means we need to determine the length of “Hello World!” in bytes. We can determine this by using a tool like CyberChef to convert the string to Hex (48 65 6c 6c 6f 20 57 6f 72 6c 64 21) and then counting the bytes (12). We will then type “mov rdx, 12”. The rest of the code stays the same, and then we can click “Execute” to move on to our penultimate challenge. #10 tasks us with opening a file, “/etc/passwd”. We start off by creating our call after the first “TODO” comment, which we can do by using “call read_passwd”. Our next step is to reference our function by using “read_passwd:” and then use “mov rax, 2” to use the sys_open syscall. Our next step is to set rdi to the file name by using “pop rdi”. Our next step is to set rsi, which we are told to use 0, so we type “mov rsi, 0”. The next step is to set rdx, which again we are told to use 0, so we type “mov rdx, 0”. The rest of the code stays the same, and then we can click “Execute” to move on to our final challenge. #11 tasks us to bring everything together, and maybe do a little extra research, to not just open, but read a file and then write the output to stdout. We can pretty much start out with our code from task 10. We need to set our call “call read_file” and then reference the call immediately after the file name with “read_file:”. Next, we need to create a sys_open call, which is exactly what we did in #10 and that code can be copied over (no need to reinvent the wheel!). We then end this function with “syscall”. Next, we need to create our sys_read, so we need to use “mov rdi, rax” to take the file handle set in the first call and move it into the rax register. We will then use “mov rax, 0” which invokes the sys_read call, as found in our system call table. We can use “mov rsi, rsp” to set the buffer to hold the contents of our file that we’ve just opened and read. We will then use “mov rdx, 136” to set the length of the file (I played around with this number by starting at 100 and then going to 150 and working back and forth until I found the number that got just the message to appear.) We then end this function with “syscall”. Next, we need to write the contents of the file to stdout. We start off by taking the length of the file set in the previous function and moving it into the rdx register with “mov rdx, rax”. Next, we set rax as 1 to utilize sys_read with “mov rax, 1”. We then set rdi as 1, since we are told that the file descriptor for stdout is always 1, so we use “mov rdi, 1”. Then we can use “mov rsi, rsp” to again set the buffer. We then end this function with “syscall”. Finally, we can call our sys_exit by using “mov rax, 60” and “mov rdi, 0” to set our exit code to sys_read, and then end this function with “syscall”. We can then click “Execute” to run our Shellcode and are provided with the following information in Stdout:Objective 7 — Printer Exploitation
We can find the link to this challenge within the objective information in our badge, or we can travel to Jack’s office and find the actual printer and click on it. We’re told that we need to read the contents of “/var/spool/printer.log” and find the name of the last file printed, which contains a .xlsx extension. We can talk to Ryber Cyster in Jack’s office and she will give us several good hints to help complete this challenge. First things first, we need to enumerate the web gui. As we move around this site, we see that there are multiple options available to us, however they all require a login. Without knowing the login, we will need to find some way to either get a shell or print out the necessary information in the gui itself. Using the clues given to us, it seems like the best route to take is to go through a firmware exploitation. We can go to “Firmware Update” and then download the current firmware to take a look. The firmware downloads as “firmware_export.json”. If we open this file up in our favorite text editor, we see that the file is contains values for “firmware”, “signature”, “secret_length”, and “algorithm”. The “firmware” value appears to be base64 encoded, so we can copy that and take it to a tool such as base64guru.com and use the “Base64 to File” decoder. We can then download and extract the resulting “application.zip” file, which shows a “firmware.bin” file. Using the hint provided to us, we should now use the hash_extender script to assist us further. After reading up about Hash Extension Attacks, we need to be able to make our own zip file containing our payload, append it to the end of the authentic firmware zip file, and then it should be read by the printer. Let’s create our own text file called “firmware.bin” and let’s get a script to work. Looking at the hints, the “incoming” directory shows it’s using Ruby. Seeing as the troll connected to this objective is also named Ruby, let’s look into ways of gaining shell access in Ruby! Going to gtfobins.github.io/gtfobins/ruby/ privides us with multiple codes available for various Ruby attacks. Let’s use the Reverse Shell payload for this. export RHOST=Objective 8 — Kerberoasting on an Open Fire
Okay, not going to lie, this one earns the 5 tree difficulty! First off, we are told we can talk to Eve Snowshoes in Santa’s office for hints. We are also provided the link to the ElfU Portal to begin this challenge. Clicking on the link takes us to a registration page where we need to enter our First and Last Name, and a email using a real domain name. Not one to give out my real information, let’s register as Nunya Bizness and we’ll get a temporary email address from temp-mail.org/. After confirming we’re not a robot, we are taken to the New Student Domain Account Creation page. We are given an ElfU Domain Username and Password, along with a SSH link to access the grading system. (This system resets every night, so if we need to come back and work on this another day, we will have to register as a new user again.) Once we log into the SSH portal, we are provided with screen with options to either Print Current Courses/Grades or Exit. Through some trial and error, we can find out how to exit this to Python by pressing ctrl+d. Once to our Python CLI, we need to exit to a command shell, which can be done by using os.system(‘/bin/bash’). This presents us with a system CLI within grades.elfu.org! We can begin our enumeration of this system by seeing what’s in our current directory with ls, however it’s not very exciting as it’s empty. Let’s take a look at what other systems are out there for us by using route -n. This gives us some good starting points. If we run ifconfig then we find out that we are currently on 172.17.0.2. Let’s do some further enumeration into the 172.17.0.0/24 range. We can go to nmap and use nmap -sV -PS22,445 172.17.0.0/24 -p 53 which shows that we have 172.17.0.1, 172.17.0.2, 172.0.3, 172.17.0.4, and 172.17.0.5 up. Out of these, 172.17.0.4 is the only one with port 53 open, so let’s do some further digging into that system. (NOTE: The server IP address changes daily, so the server addresses used in this might differ from your playthrough.) If we use nmap -sV -PS22,445 -Pn 172.17.0.4 to enumerate, we will find that there are numerous ports open. We can use this same command ot look at each of the others to see if there are any other interesting services available, however let’s continue digging into this one some more and let’s look into that samba system. Using nmap -p 445 — script=smb-enum-shares.nse,smb-enum-users.nse 172.17.0.4 we can get a good listing of each of the SMB shares. This provides us with a wealth of good information. To start off with, we see five possible shares to play around with, including “elfu_svc_shr” and “research_dep” which look like they could be very interesting. Looking further at “IPC$” however, we can see that it is the only one that allows for anonymous access and that we have read/write permissions to it! If we use smbclient \\\\172.17.0.4\\IPC$ we are asked for our user’s password and then taken into the directory, however we sadly find that it is empty, so we’ll need to look in another castle for our princess. ☹ Let’s go back and look into that 10.128.1.0/24 range with nmap -sV -PS22,445 10.128.1.0/24 -p 53. This provides us with some promising info on 10.128.1.53 with what looks like a domain controller and port 53 open! If we do our samba enumeration on this host, we don’t get any returns. However, if we do smbclient -L \\\\10.128.1.53 we find 5 available shares. We can try to log into these shares with our username and password, however we don’t find any useful information. We need to find out how to get into one of the shares available on 172.17.0.4, so let’s see what other tools we have available. If we watch the video by ChrisD, he provides some valuable hints on how to get another user by using the GetUserSPNs.py file. Now, we don’t have that file available to us in our home directory, so let’s see if by chance another user has left it for us somewhere. We will need to use the command find / -iname GetUserSPNs.py to search through what we have available on the system we’re currently SSH’d into. This results in telling us that we have access to this file in “/usr/local/bin”, so if we change into that directory, we find that there are SEVERAL scripts available to us!! Let’s try the command from ChrisD’s video and use GetUserSPNs.py -dc-ip 10.128.1.53 elfu.local/Objective 9 — Splunk!
We can now move on to Santa’s Great Room and talk to Angel Candysalt and find objective 9. Clicking on the terminal brings up the information about the challenge and then opens into the interface. Task 1 is to find the git commands Eddie ran most often. Using the Sample Splunk Searches at top, we can use #1 Sysmon for Linux — All events, which opens up to a predefined search string. Once here, go to the bottom of the selectable fields on the left side and click on “xxx more fields” and make sure “CommandLine” is selected. Type “git” into the end of the search field and then click the green magnifying glass to update the search. Then, click on the “CommandLine” link under “SELECTED FIELDS” and our answer will be at the top of the list under “Top 10 Values”. For Task 2, we can use the same search from Task 1, and use the search terms “git remote add origin” and “partnerapi”. “Git remote add origin” is the command used to create an entry into Git to specify a name for a URL. So, using that in conjunction with the known “partnerapi” repo, we can easily find the command he used. This will show up in the main results screen, or we can click on the “CommandLine” field and we’re given the exact commands. For Task 3, we can again use the previous search, however remove the “git remote add origin” and add “docker” and execute the search. Again, click on the “CommandLine” link on the left and we’ll see three entries. We need to remember that there is an old and a new syntax for starting a docker project, so we need to look for the new syntax for this answer. For Task 4, we will need to use the 6th sample Splunk search for GitHub Webhook Events. Once we click on that, we can further isolate our search by adding the field “compare” to our search by scrolling down and clicking the “xxx more fields” and choosing “compare”. From here, we can click on the link for “compare” and we see 5 entries for github.com/elfnp3. From here, if we open a new window/tab and navigate to https://githubcom/elfnp3 we will find that only the “dvws-node” repository currently exists. By looking at the README.md, we see that it tells us that this is a replacement for another github repository. If we scroll down a little further, we see the command used to clone the original repository, which will be the answer we need for this task. For task 5, we need to look for an unknown JavaScript library. We can use a blank search for this one and search for the terms “*npm install” and “partnerapi”. Searching for “*npm install” will look for any commands using that term so we can see what all has been installed. We can then click on our CommandLine selected field and we can see that only one JavaScript library was installed and we have our answer! For task 6, we are asked to start with a predefined search to find the “full process_name field of anything that looks suspicious.” The search is filtered down to two IP addresses. We can click each one individually and select “View events” and select “process_name” from the left side under “Interesting fields” to see what values are associated with each one. IP 192.30.255.113 shows us a value of “/usr/bin/git”, which is benign. IP 54.175.69.219 shows us a value which is definitely suspicious! For task 7, we can use the predefined search “Sysmon for Linux — Network connection” and then we can add in the suspicious information from task 6 to narrow it down even more. This provides us with only one event to look at, and we are told in the task that we need to look at the “Process creation event” to find more information. If we look into the “process_id” for our event by using the “Interesting fields” on the left, we will find the process id. We can click on it, and then remove all of the other search terms from our search bar and execute the search (only searching for “process_id=xxxx”). We now have “parent_process_id” as an available field under “Interesting fields”. If we click on that and then click on the ID value, we will be able to remove the original “process_id” from the search bar and then execute the search (only searching for “parent_process_id=xxxx”). We can now use the “CommandLine” interesting field to look at what commands were issued by events sharing this parent id. We can see that there is one of the events that utilizes the “cat” command to read several files, and thereby providing our answer. For our last task, we need to identify the Bash script that accessed sensitive files. If we use the information we’ve gathered up to this point, we can narrow our search and get the script name easily. The task says to use “Sysmon Process creation”, so we can use our predefined search as a starting point. Now, we know that task 5 asked us to find the JavaScript library which then was related to the suspicious command from task 6. If we use that same JavaScript library as a search term, and then use “.sh” to narrow down for any Bash scripts associated with it, we are presented with three events. If it’s not immediately noticeable in the results, we can click on “CommandLine” under “SELECTED FIELDS”, and we will see there is only one script file listed, and we now have our last answer! Now, after submitting that, we get a popup which gives our thanks from Santa and the answer to go into our badge!Objective 10 — Now Hiring!
This objective can be accessed directly from our badge, and we can talk with Noxious O. D’or in Jack’s bathroom for hints. If we click on the link in the badge, we are taken to a website where we can apply to work at Frost Tower. We are tasked with acquiring the “secret access key” to complete this objective. Looking around the site, we see that the “Apply” page has an application form that we can fill out. We know, from talking to Noxious, that we will most likely be looking for an IMDS exploit. We also get the big hint “anytime you see URL as an input, test for SSRF.” So, we see on the “Apply” page, that we have a URL to input our public NLBI report. Let’s go ahead and open up Burp and get ready to intercept our traffic on this and see if we get anything useful. We don’t have a link to anything, so let’s first send this without filling in the NLBI report field. Hmm…, nothing very exciting happened. Let’s go back to the input form again, this time, let’s put in our IMDS enumeration from the documentation provided from the hint from Noxious (http://169.254.169.254/latest/meta-data). This time, we get some additional items on our response page, but it looks like there’s something missing in the middle. If we right-click on it and choose “inspect”, we will see that this image contains the name we put in the “Name” field on the application form. If we check this out in Burp, we see that we have a GET request for “/images/USERNAME.jpg” at the bottom of the list. If we select this request and look in the Response pane, we see some interesting information relating to AWS! From here, we can look for the security credentials to get our answer! If we go back to the application form and add “iam/security-credentials/jf-deploy-role” to the end of our URL and resubmit, we should get some good info. If we go back into Burp, we see the Response pan for our image has now updated and includes all of the security information we need, including our “SecretAccessKey”. From here, we only need to copy that key and paste it into our Badge and we’ve completed this task!Objective 11 — Customer Complaint Analysis
This task is again accessed directly from our Badge. We’re tasked with examining a PCAP file see which three trolls complained about the human. We can talk to Tinsel Upatree in the kitchen for hints using Wireshark and working with PCAP files. First thing, we know that we’re looking for something that has been submitted, so we can apply a search filter of: From here, we can expand the “HTML Form URL Encoded” field to view the contents of each POST. Going through each one, we find that all but one is written by a troll about a guest. The one written by a human lists their room number, 1024. This looks like another good filter. If we use then we will filter all of our results for only POST request which contain “1024” as a url encoded-form value. (The filter for “1024” can be derived by expanding “Form item: ‘guest_info’ = ‘Room 1024’”, right clicking on “Value : Room 1024”, and then clicking “Prepare a filter ->…or Selected”. The filter will need to be tweaked by changing “==” to “~” so we get the wildcard option, and then making the value only “1024”.) Once we apply this filter, we have four requests, three from our trolls, and one from the woman. We can now pull out each of the three troll names, place them in alphabetical order, and put them into our badge to complete this challenge. (We can do this task without using the filters and simply sort on the “Info” column and look through each POST request, find the one human request, and then look through the rest to find who is complaining about her. The other complaints are all pretty humorous, so we get a good laugh out of reading through them, however it is slightly more time consuming to do this way.)Objective 12 — Frost Tower Website Checkup
We’re onto the penultimate objective of KringleCon 2021! We’re tasked with looking through Frost Tower’s website for any security issues, and we are even provided with the source code for analysis! We’re asked to find Jack’s ToDo list and find what position he plans to offer Santa. We can talk with Ribb Bonbowford in Santa’s dining room for some hints. If we visit the website, we’re presented with a simple form to submit an email. If we submit something, it just tells us “Thank you!” and nothing happens. We’re given the source code, so we can look in that to see if there are other pages we can go to, or we can use a tool like dirb. Either way, we find that there are other pages we can manually navigate to, such as “dashboard”. We can type in “dashboard” at the end of the URL and it takes us to another sign in page. This page doesn’t let us do anything without a password, so if we click on “BACK TO FORM” we get another form we can fill out. Once we fill this one out and click “SAVE”, we’re presented with a message saying the data was saved. We still don’t have a password though, so what else can we do? Just for kicks, let’s try adding our user again with the same information. This time we get a message that the user already exists in the database, so we know our info is getting stored. Let’s try manually going to “dashboard” again, and this time we’re presented with a page showing all of the users in the database!! Now, the hint from Ribb talks about sqli and knowing the source, and he provides us two good resources to look through. If we open up the source material we downloaded, we see that there is a “server.js” file. If we open this up, we find that this is a wealth of information about the whole website and the underlying database! If we go through each of the requests, we find that there is one request that is different from all of the rest. We see that the get request for “/detail/:id” is unsecured because it is missing the “tempCont.escape” function that the other requests contain. This looks like where we’ll be able to exploit some sql queries! Going back to the webpage, let’s click on “detail” next to one of the usernames. We see that the url now has “/detail/###”. Let’s play around a bit with some sql. The server.js file shows that the main query for this field is “SELECT * FROM uniquecontact WHERE id=?”. If we play around with this some, we can find that “-1, -1 UNION SELECT * FROM uniquecontact — “ will list every contact in the database. This is helpful, but doesn’t really answer anything for us at this point. Our source files don’t have anything about a ToDo list, so we need to do some further enumeration to find out some other table names and the data they might contain. There are easy ways to do this, and there are difficult ways involving some brute force. Whenever there’s a hard way to find something, that’s the way I like to go! Let’s go to Burp to help us solve this challenge. First, we need to find some other table names. We can use the following SQL query to do that: (SELECT (CASE WHEN (EXISTS(SELECT table_name FROM information_schema.tables where table_name like ‘a’)) THEN 1 ELSE 4384*(SELECT 4384 FROM INFORMATION_SCHEMA.PLUGINS) END)). If we capture the detail page for a record, in this case 475, we can then send it to repeater and try our query by pasting it into the GET request. We see that we’re getting some filters applied to our request. Easiest way around this is to convert any of our special characters to ASCII code and then resubmit. So, our new query is: %28SELECT%20%28CASE%20WHEN%20%28EXISTS%28SELECT%20table_name%20FROM%20information_schema.tables%20where%20table_name%20like%20%27a%25%27%29%29%20THEN%201%20ELSE%204384%2A%28SELECT%204384%20FROM%20INFORMATION_SCHEMA.PLUGINS%29%20END%29%29. If we copy this and paste it after “/detail/475,” we find that we get a valid return with data back. If we capture this request and send it to Burp Intruder, we can really start to have some fun! In Intruder, we need to first clear out our positions. Next, we need to select what we’re going to use as our position, which will be the letter “a” where we have “table_name like ‘a’” in our query. We’re just using one position, so we’ll keep our “Attack type” as “Sniper”. Once we have our position set, let’s go to our payloads. For this, let’s click the “Add from list” dropdown and select “a-z” and “Directories — short”. Let’s go ahead and save our Intruder attack config with payload positions. Now, let’s start our attack! Once the attack is complete, let’s click in the filter and make sure it only shows us 2xx responses so we know what to look for. If we look in our list, we can table names beginning with letters, and then some have words. If we look through the list, we see names like “client”, “email”, “events”, “files”, “global”, but we see “ToDo” towards the bottom! Now, at this point, we could do some more bruteforce enumeration to map out every possible table name in this database, however we know we’re looking for Jack’s ToDo list, so let’s concentrate our focus on the “ToDo” table. Now, we need to start finding the columns in our “ToDo” table. Let’s revisit our query from before, and tweak it a bit to search for column names. We can put “todo” in the table_name location, and then add a section for column_name, with “a” as what we will use for our variable. We also need to change “information_schema.tables” to “information_schema.columns”. %28SELECT%20%28CASE%20WHEN%20%28EXISTS%28SELECT%20table_name%20FROM%20information_schema.columns%20where%20table_name%20like%20%27ToDo%25%27%20AND%20column_name%20like%20%27a%25%27%29%29%20THEN%201%20ELSE%204384%2A%28SELECT%204384%20FROM%20INFORMATION_SCHEMA.PLUGINS%29%20END%29%29 If we use the same payloads as before, we end up with a fairly short list. (We could use some of the other payload options to put in more complete words, however that will significantly increase our search time.) We don’t have any useful full words, but we have columns beginning with “c, i, and n”. We know that we at least have one column starting with “comp”. Now, let’s start with “comp” and see what we can figure out. We take “comp” and put it into the query just before our “a” attack position. Let’s change our payload some, now that we know we don’t have any other full words to go with. Let’s use “a-z” as our payload for this one. Let’s start the attack, and it should finish quickly, we’ll see that only one letter gives us a status 200, and that is the letter “l”. We can now take that letter back to our positions and keep going like this until we do not get any more status 200 returns. We now have our first full column name, “completed”! Now Let’s do this starting with each of the other 2 letters. We should find that we end up with “completed”, “id”, and “note” as our column names. Now, using some reasoning skills, we can guess that “id” is most likely a number, “completed” is probably a “yes/no” or “true/false”, and “note” is probably a string of characters. If we want to find out what Jack’s up to, the “note” column is most likely where it’ll be. Now, we don’t know how many rows, or how many words are in each row, so this could take us a while! Let’s use our first query again, and this time we’ll use the * character (%2A) before “FROM”, and replace “information_schema.tables%20where%20table_name%20like” with “todo%20where%20note%20like”. What this will do is select the information from within the note column from the todo table. %28SELECT%20%28CASE%20WHEN%20%28EXISTS%28SELECT%20%2A%20FROM%20todo%20where%20note%20like%20%27a%25%27%29%29%20THEN%201%20ELSE%204384%2A%28SELECT%204384%20FROM%20INFORMATION_SCHEMA.PLUGINS%29%20END%29%29 Let’s set our payload to include “a-z”, “0–9”, and let’s put in all of our ASCII characters for good measure (being careful with %25 as it acts as a wildcard). Filtering for our status 200 results gives us 7 letters that start off rows: b, d, e, f, s, u, w. Now, this could be that we only have 7 rows, or we could also have some rows that start with the same letter, so we’ll need to be careful with our enumeration. For sake of time, we’re not going to go through each letter here, and we’ll go ahead and start with “w” as our first letter since that’s the row that we want. To give a jumpstart, use with%20santa%20defeated%25%20offer%20the%20 as your beginning and then start bruteforcing from there. This will give you the job that Jack plans to give Santa if he succeeds!Objective 13 — FPGA
Woohoo, we’re on our final objective to save Christmas and foil Jack’s plan!! To solve this challenge, we need to head up to the roof of Frost Tower. Talking with Crunchy Squishter lets us know that they need to have a FPGA chip to get something working and that we can talk with Grody Goiterson, in Frost Tower’s Lobby by the elevator, for some hints. Clicking on the FPGA Programming terminal opens up to an informational window from Prof. Qwerty Petabyte, which tells us the point of this task and gives some hints. Talking with Grody gives us some good hints of some external resources as well. Once we close the introduction window, we’re presented with a Verilog programming screen and some sample code. The best thing for us to do is to watch the talk from Prof. Qwertybyte about FPGA, and then check out the resources provided by Grody. We can take the code use in Prof. Qwertybyte’s presentation, as well as the resources from Grody, and doing a little bit of internet searching for “Generating square wave using FPGA” to really hit it home. The sample code in Prof. Q’s talk should give us some good knowledge to get started, and then using sample code for generating a square wave get us where we need to be. We’re told in the sample code and notes that we’re working with a 125MHz clock and that we can’t change the three inputs and one output that are designated for us. It is up to us to use this information to then create a working code to produce a square wave output of our frequencies. We need to have one code that can take any input frequency and produce a square wave, and we have three known frequencies and a random frequency we will need to satisfy before we can complete the challenge. If we look at Prof. Q’s sample code, we see that it’s slightly different than what we are required to do. This code is using a 100MHz clock, and is set on a 26:0 reg, however we need to be using 125MHz and 31:0. If we use some code from our internet searching, we can find one that we can get to work pretty easily to generate one frequency at a time with a little tweak. Looking at https://numato.com/kb/generating-square-wave-using-fpga/ will provide us with good information and our starting code. We see that this code is set to use 100MHz and 8:0, however will work with just a few tweaks! Let’s see if we can get the 500Hz frequency to work before we move on to the rest. If we take the Numato example, we know we need to change any reference for “8’h00” to “32’h00” so we have it at 32 bits instead of 8. We also need to change the CLOCK_FREQUENCY to “125000000”. Let’s also set our CLOCK_FREQUENCY as an “integer”. If we don’t change anything else and run the program with 500Hz, we see that there are still some tweaks with variables. Once we fix the errors so that we are using the variables as defined in our requirements, we find that we still need to do something with the “freq” variable. If we look at the fpga4fun.com site that we received as a hint, we see that we need to also divide our sysclk or CLOCK_FREQUENCY by our freq. So, if we change “CLOCK_FREQUENCY/2–1” to be “(CLOCK_FREQUENCY/freq)/2 -1” we see that we’ve got a frequency of 50000Hz instead of 500Hz, so we’re off by a magnitude of 100. Changing our formula again to multiply that by 100 should get us where we need to be. If we run this on 500Hz, we see that it’s an exact match! Now, let’s try it on the others. We see that it works on 1KHz, but not on 2KHz or Random. Let’s do some more research into why this is. Looking through fpga4fun.com, we’re shown an example which uses a “clkdivider” function to handle the math of dividing our system clock by the input frequency and dividing it in half. Let’s try implementing that and see what we get. We should get the same results as before… What do we know about number types, e.g. integer and real? Integers are whole numbers and real numbers include decimals. Our issue with going from 1KHz to 2KHz involves some rounding. If we try to simply change our integers to real numbers, we find that we know generate our 2KHz frequency exactly, but our random still doesn’t work. We know that the system doesn’t handle rounding and that we ne need program it to do it, so let’s look up how to convert our final formula to an integer from a real number. If we check out System Real Conversion Functions (hdlworks.com) we can find out how to easily convert our formula to output a real number. Let’s go ahead and move our “*100” into our “clkdivider” variable. Using $rtoi will convert an integer into a real number. If we change “clkdivider — 1” to be “$rtoi(clkdivider) — 1” we now get a square wave output on all options that meets the frequency output requirements!Check out my SANS Holiday Hack Challenge 2022 writeup for more KringleCon fun!